A primer on the cascade and specificity
Categories
Often feared by developers, the cascade and specificity is actually really simple if you utilise the right mental model when authoring CSS.
Almost as inevitable as death and taxes, developers will cite that the cascade and specificity are what makes CSS difficult to work with. Sure, the cascade and specificity are going to cause problems if you don’t account for them in your CSS, but if you have a base-level understanding, I promise, your CSS skills will sky-rocket.
A lot of the time, the cascade and specificity are explained within and inch of their lives in expansive guides or detailed articles. These articles are fantastic, but I think the size and complexity of them can scare developers too, so I’m going to simplify it for you today. In fact, keeping things simple is one of the most effective ways to keep any codebase manageable and maintainable. It’s especially the case with CSS though. Let’s dig in.
The C in CSS stands for Cascade permalink
Let’s tackle the elephant in the room first. The Cascade is an algorithm that solves conflicts for you where multiple rules could apply to an HTML element.
Let’s use a really simple example:
- Code language
- css
.my-element {
	background: goldenrod;
	background: coral;
}
This element has two background declarations. The cascade has done its thing and determined that .my-element will have a coral background. Why though?
Because the coral declaration comes after the goldenrod one, coral wins. In the vast majority of your standard CSS authoring, remember this and you’re good to go. There are exceptions though, so let’s focus more on those because this first bit was dead easy right?
See the Pen A square with a coral background by Andy Bell (@piccalilli) on CodePen.
The order of importance
No, this isn’t a weird British Royal Family thing; it’s a simple ruleset to remember because not all properties are equal. What I mean by that is certain CSS property types will be prioritised over others. This list is ordered least to most specific.
Normal declarations
This is your background, padding, line-height and margin properties. Y’know, the stuff you’re slinging into your code most of the day.
Active animations
This is when your animatable properties are being affected by an active @keyframes animation.
Declarations that utilise !important
Not to be feared but to be admired: the humble !important property does exactly what it says on the tin: it determines an important value. It’s added as part of your declaration value like so:
- Code language
- css
.my-element {
	background: grey !important;
}
This will ultimately win (nearly) every time, but treat it as it will win every time and you won’t have problems with it.
The !important property is designed to be honoured by proxy of it being important, so only use it when you feel you absolutely need to. I’ll write more on this if people want me to, but use it wisely and !important can be really useful and helpful in keeping your codebase simple.
The order of origin
This order is taken into account by the cascade from least specific to most specific.
User agent base styles
Every major browser ships with a user agent stylesheet. These are default styles that are applied to HTML elements to prevent every element looking the same if there’s no CSS that applies to that HTML.
Local user styles
These styles are mostly operating system level stuff such as font size preferences. Local user styles also technically apply to CSS that is authored in browser extensions but my recommendation in more modern times is to presume that these are injected as <style> which will be more specific than styles authored in CSS files.
Authored CSS
Hey champ, this is your stuff that you are writing!
Authored !important
Yup, just like we covered earlier: those !important values are gonna win over your standard property values.
Local user styles with !important
Say you absolutely want your font size to be the same on every website. An operating system and browser combo could technically declare that as an !important property and that will beat all of the above.
User agent !important.
Finally, if the user agent styles have an !important value, this will ultimately win.
That’s it for the cascade, let’s tackle its best friend: specificity.
Specificity permalink
Fun fact, because I’m from Yorkshire in the UK, I struggle to say this word, which for someone who teaches CSS, is not ideal. I digress though, but for a reason — to give you a quick breather — so retract those shoulders and breathe out because specificity isn’t hard, trust me.
Let’s go back to .my-element but tweak the CSS. It’s important to note that we’re using <div> element that has a class attribute.
- Code language
- css
div {
	background: goldenrod;
}

.my-element {
	background: coral;
}
The winner is coral because .my-element has a specificity score of 0-1-0, whereas div has a specificity score of 0-0-1. Let’s dig into scoring some more.
See the Pen CSS class wins because it's a more specific selector by Andy Bell (@piccalilli) on CodePen.
Specificity scoring
Each selector rule gets a score. The higher the score, the more likely that rule’s CSS is going to apply. The score is in this format: 0-0-0, or "hundreds"-"tens"-"singles". This does expand, but let’s not worry about that right now until we need to. Let’s do a quick fire scoring rundown.
Universal selector — AKA the wildcard selector
- Code language
- css
* {
	/* Your CSS declarations and properties here */
}
Score: 0-0-0 — 0 points
Type selector — AKA element selector
- Code language
- css
h1 {
	/* Your CSS declarations and properties here */
}
Score: 0-0-1 — 1 point
Pseudo-element selector
- Code language
- css
::before {
	/* Your CSS declarations and properties here */
}
Score: 0-0-1 — 1 point
Class selector
- Code language
- css
.my-element {
	/* Your CSS declarations and properties here */
}
Score: 0-1-0 — 10 points
Pseudo-class selector
- Code language
- css
:hover {
	/* Your CSS declarations and properties here */
}
Score: 0-1-0 — 10 points
Attribute selector
- Code language
- css
[href] {
	/* Your CSS declarations and properties here */
}
Score: 0-1-0 — 10 points
ID selector
- Code language
- css
#myElement {
	/* Your CSS declarations and properties here */
}
Score: 1-0-0 — 100 points
Inline style attribute
- Code language
- html
<div style="background: blue"></div>Score: 1-0-0-0 — 1,000 points
!important rule
- Code language
- css
.my-element {
	background: red !important;
}
Score: 1-0-0-0-0 — 10,000 points
Wait just one minute, !important is a cascade thing, right?! It’s both a cascade and specificity thing. Someone with a name like Chad Smith might cite this as the reason why CSS “sucks” on Twitter. That’s not true though because all you have to do is remember !important applies to the cascade and specificity, just like you need to remember that JavaScript can’t compare numbers properly. All programming languages have stuff like this to learn and CSS is no different.
Also, do you remember when I said the scoring will expand? This is it. For both inline style attributes and !important rules we stitch on an extra number. For you, dear reader, this is a cue that the CSS you’re writing better be damn important because you’re in the realms of very high specificity.
Combining selectors equals more points
Now you know how many points each selector type gives you, let’s combine some to show how this part works.
- Code language
- css
h1#myElement {
	/* Your CSS declarations and properties here */
}
We’ve got 1 point because we’re using a type selector (h1) and 100 points because we’re also using an ID selector (#myElement). Therefore the specificity score here is 1-0-1 — 101 points.
Let’s do one more for fun.
- Code language
- css
h1.my-element::before {
	/* Your CSS declarations and properties here */
}
We’ve got 2 points because we’re using both a type selector (h1) and a pseudo-element selector ::before. We’ve also got 10 points because we’re using a class selector (.my-element). Therefore the specificity score here is 0-1-2 — 12 points.
:not(), :is() and :where()
Let’s say you have this CSS:
- Code language
- css
h1:is(.my-element) {
	/* Your CSS declarations and properties here */
}
It has the exact same specificity score as:
- Code language
- css
h1.my-element {
	/* Your CSS declarations and properties here */
}
This is because with both :is() and :not(), the most specific selector passed into those pseudo-classes will be picked, so don’t think about using those as a specificity boost.
With :where(), that pseudo-class and any selector passed into it has no specificity. Let’s go back to one of the earlier selectors to demonstrate.
- Code language
- css
h1#myElement {
	/* Your CSS declarations and properties here */
}
This has a score of 1-0-1 — 101 points. Let’s add :where() into the mix.
- Code language
- css
h1:where(#myElement) {
	/* Your CSS declarations and properties here */
}
This now has a score of 0-0-1 — 1 point because the 100 points from the ID selector has now been discarded because it is within a :where() pseudo-class. It’s why you probably spotted its usage in CSS resets because those reset styles are much easier to override thanks to :where()’s low specificity.
Child and sibling selectors add no specificity
One quick thing to remember is using child and sibling selectors (>, ~ and +) won’t affect your specificity score. For example, these have the same score as each other:
- Code language
- css
.my-element li {
	/* Your CSS declarations and properties here */
}

.my-element > li {
	/* Your CSS declarations and properties here */
}
Dev tools are your best friend permalink
If you open up dev tools in your browser and go to the styles tab, it’ll look a bit like this:
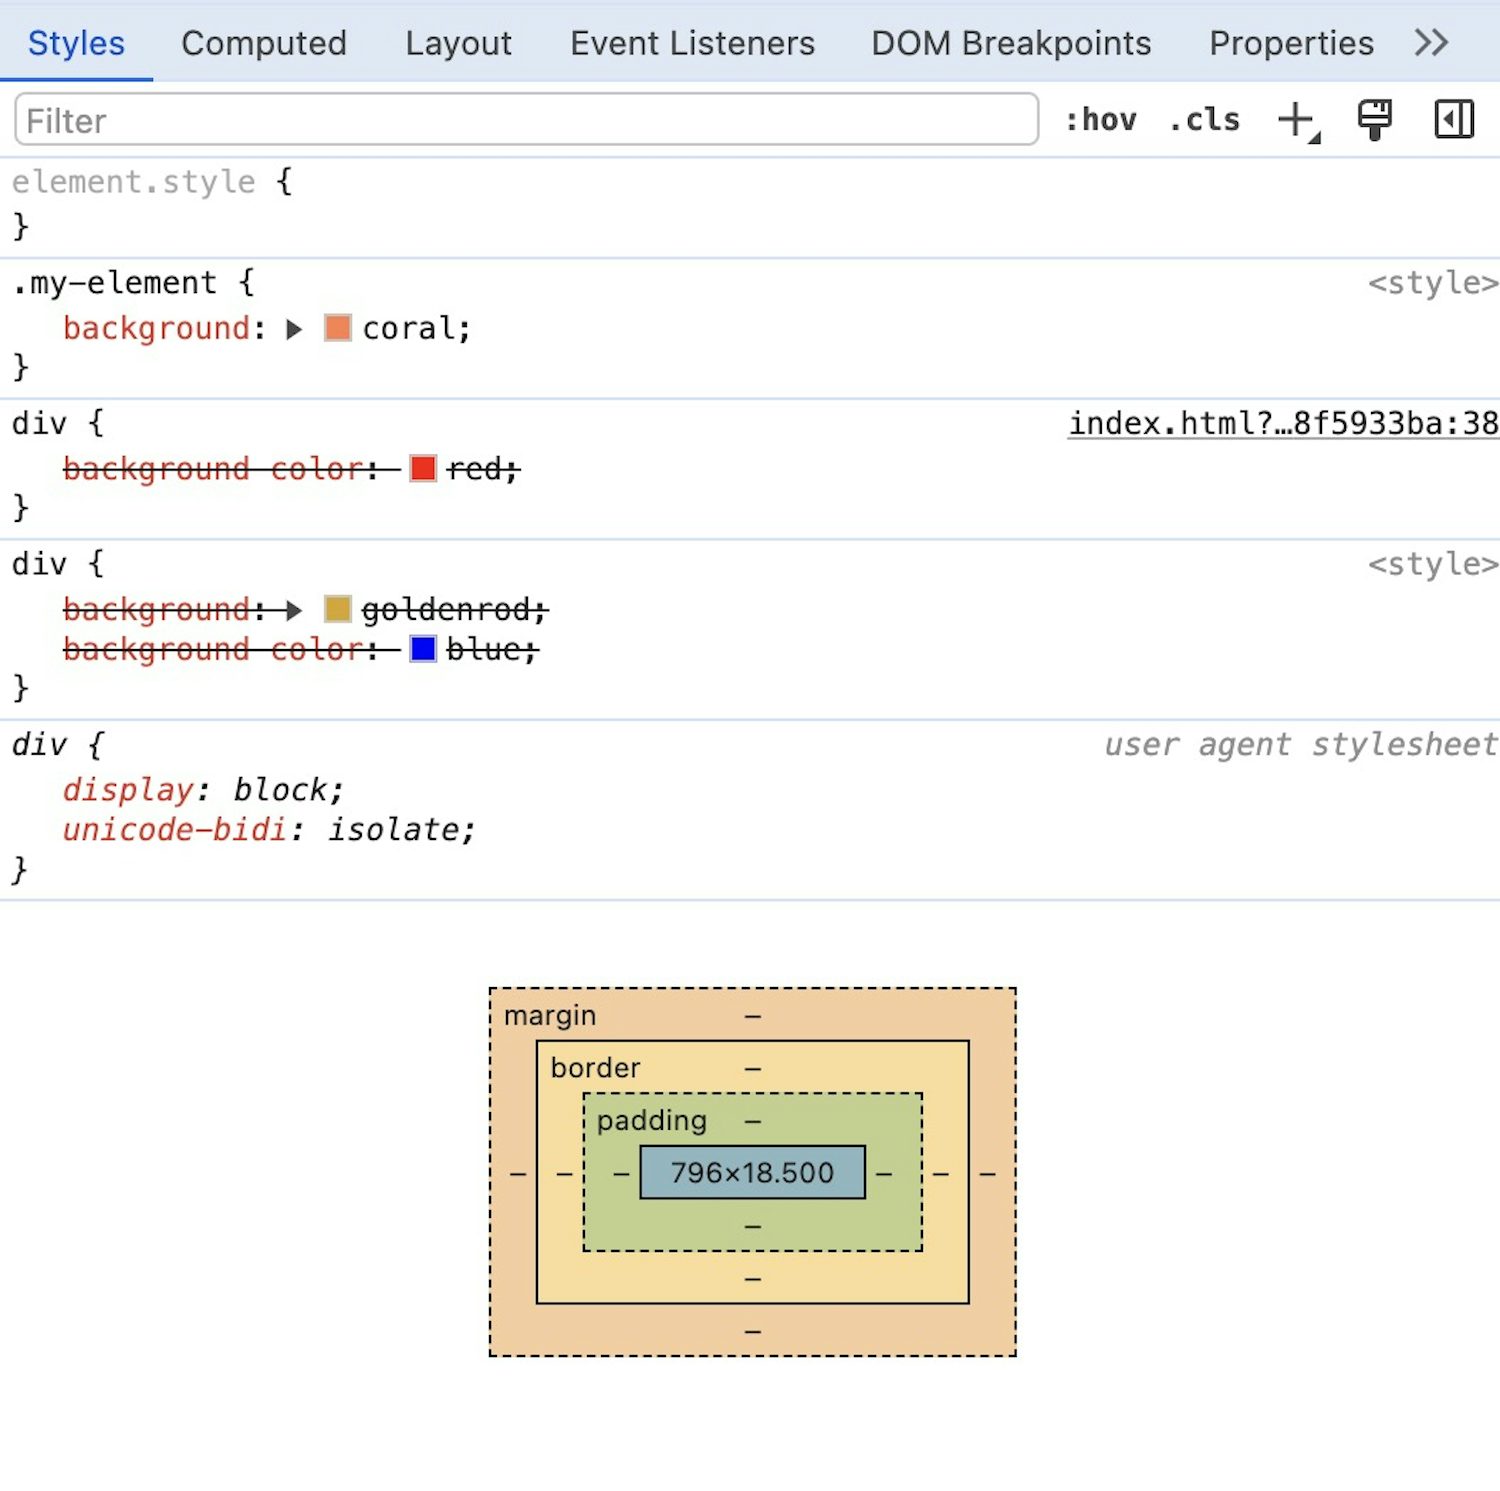
The stuff that’s less specific in terms of both the cascade and specificity will be lower down the panel. Anything more specific will be higher in the panel. What has been discarded will be crossed out, so by proxy, what isn’t crossed out is applied. That knowledge alone should make your life easier!
Wrapping up permalink
I strongly recommend that you get a specificity calculator in your arsenal. My favourite is by the fantastic folks at Polypane. Their specificity calculator is super easy to use and does a really good job of breaking it down for you.
There’s also new CSS capabilities that can help, such as Cascade Layers. I personally haven’t found the need for these (yet), so I’m not qualified to write about them. I’ll let someone who definitely is explain them to you instead.
I’ll finish by saying I find this stuff super boring to write about but it’s really important to understand. I hope this primer will make you feel more comfortable with two of the most fundamental parts of CSS. If you’re looking for quick advice on how to deal with this in the real world, I would say keep your selectors as low scoring as possible. If you get stumped, remember the order of origin and use dev tools! Remember, if it’s crossed out in the CSS panel: something more specific is in play.